
A riding mower can tow a small trailer only when its manufacturer permits towing and the hitch, trailer load, and operating conditions meet the mower’s limits.
And one of the best ways of achieving this is by mounting a ball hitch to your lawn tractor.
This guide explains how the Great Day Lawn-Pro Hi-Hitch fits a compatible conventional riding mower. Confirm the mower model’s approved towing arrangement before buying or drilling; this is not a universal zero-turn installation guide.
How to put a ball hitch on a lawn mower: steps and guidelines
Whether you want to move yard debris or tow a roller, check the combined weight of the trailer and its load, the vertical tongue load, and the mower’s limits first. A hitch does not increase those ratings.
Here is how to put a ball hitch on a lawn mower (the best ways):
Method 1: Using a Lawnpro Hi-Hitch
The Great Day LNPHH650 is designed for conventional riding lawnmowers. Its braces attach to the mower’s rear plate and its body uses the existing trailer-mounting hole; check the mounting arrangement and mower approval before installation.
Its raised mounting position can help align a small trailer, but check the actual coupler height and load balance for your combination.
The hitch is aluminum and does not add engine horsepower or increase the mower’s permitted trailer or tongue load.
It accepts a trailer ball with a ¾-inch shank or smaller. The ball is not included; select one whose ball diameter matches the trailer coupler and whose mounting hardware fits the hitch.
Where to buy the Hitch
You can order the accessory on Amazon here or from stores selling mower accessories near you.
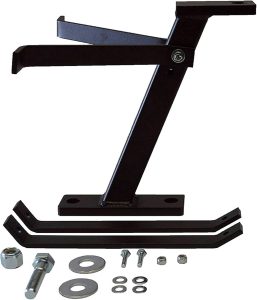
Great Day Lawn-Pro Hi-Hitch LNPHH650
- Aluminum hitch for compatible conventional riding lawnmowers.
- Mounts at the existing trailer hole with rear support braces; drilling may be required.
- Accepts a trailer-ball shank of 3/4 inch or smaller; ball not included.
- Does not increase the mower’s towing or tongue-load limits.
What will be contained in the package
The box will have the following items:
- Hi-hitch body
- Brace arms (4)(Note that you will use only 1 set)
- 5/8-inch locknut (1)
- 5/8-inch flat washers (2)
- 5/8-inch x 2 1/2-inch bolt (1)
- 1/4-inch x 2 1/2-inch bolt (1)
- 1/4-inch x 1-inch bolts (2)
- Flat washers (6)
- 1/4-inch lock nuts (3)
Steps
Use the supplied Great Day LNPHH650 installation instructions alongside the mower manual. The steps below summarize that specific hitch, not other hitch designs.
- Pre-assemble the hitch.
- Connect the Lawn-Pro Hi-Hitch body.
- Mark and drill the approved mounting locations.
- Secure the braces and then tighten all remaining hardware.
That’s the long and the short of the entire process.
Onwards now to the specific procedures.
snow blower attachment for riding lawn mower
Step 1: Pre-assembling the Lawn Pro Hi Hitch
Start by attaching one set of the brace arms to the hi-hitch body.
You’ll bolt them using the 1/4-inch x 2 ½-inch bolt. Don’t forget to add the matching flat washers as well as the lock nut.
Your final task here is tightening (but not extremely snug).
To test if you have done it right, check if the brace arms can pivot well.
Step 2: Connecting the hitch body to the mower
In this step, you will fix the Lawn pro hi hitch to the lawnmower.
Simply connect the hi-hitch body to the lawn tractor’s trailer mounting hole.
You will use the 5/8-inch x 2 ½-inch bolt here together with 5/8-inch flat washers and a similarly-sized lock nut.
You’ll again tighten until snug.
Like in step 1, the Hi-hitch must pivot side-to-side if you have completed the steps correctly.
Step 3: Drilling the mower
Drill only where the hitch instructions and mower design permit the mounting arrangement. Park securely, stop the engine, remove the key, and inspect the rear plate and the space behind it before proceeding.
In this case, line up the brace arms against the rear of your lawnmower and mark where you will drill. Try to be as accurate as possible since you want to take the shortest time.
Use the 5/16-inch bit specified in the hitch instructions for the marked rear-plate holes. Our separate post-hole drilling guide concerns fence posts, not this hitch installation.
Do not improvise new mounting points or hole sizes if the specified installation does not fit. Stop and confirm compatibility with the mower or hitch manufacturer.
Pro-Tip: Swing the braces clear and check behind the mower’s rear plate for wiring, fuel-system parts, or other obstructions before drilling.
Steps 4: Lawn pro hi hitch installation
Locate the openings you have just drilled on the rear of your mower and align with the holes in the brace arms precisely then insert the 1/4-inch X 1-inch bolts.
Add the fitting flat washers plus the nuts as we have done in the other steps.
Tighten the brace fasteners securely, then complete the manual’s final step: tighten all remaining hardware securely, including the connections left able to pivot during alignment.
That’s all.
Install the correctly sized ball with its specified hardware and tightening requirements. Check the completed assembly before coupling a trailer; follow the mower’s towing limits and operating instructions.
It may seem like a staggering amount of work but, as you have seen, it surely isn’t.
Use the completed hitch only within the mower’s permitted towing and tongue-load limits. A higher or stronger-looking hitch does not establish a greater capacity.
Method 2: Considering a homemade hitch adapter
A homemade receiver is not automatically suitable for a mower’s frame, braking, or towing limits. Prefer an attachment approved for the exact mower rather than assuming that a fabricated hitch is a safe or cheaper alternative.
Changing ball size does not establish towing capacity. The ball, coupler, mount, fasteners, and mower must be compatible, and the lowest applicable limit governs the setup.
Do not weld a hitch ball or weld a receiver onto the mower as a generic installation method. Use the mounting method specified by the component and mower manufacturers; have an unsupported mounting arrangement assessed before use.
How to make air compressor quieter
How to put a ball hitch on a lawn mower: Helpful guidelines
- Always inspect all parts prior to each use for rust or deformation. Be sure to replace all hardware rusted or deformed hardware.
- Be extra careful when pulling at an odd angle- you don’t want to be over-anxious as you may find yourself making the wrong moves (and get stuck or tip over) depending on the trailer you’re towing and the terrain.
- Stick to the pulling capacity of your mower –overstraining the mower is not only unsafe but also risks bringing down its service life.
You now know what to do if you’ve ever want to put a trailer hitch ball on your lawn mower.
Remember that working on machines can be dangerous and you need to observe all the precautions including wearing protective gear.
Also, keep in mind the highlighted guiding tips when towing a trailer or any attachment.