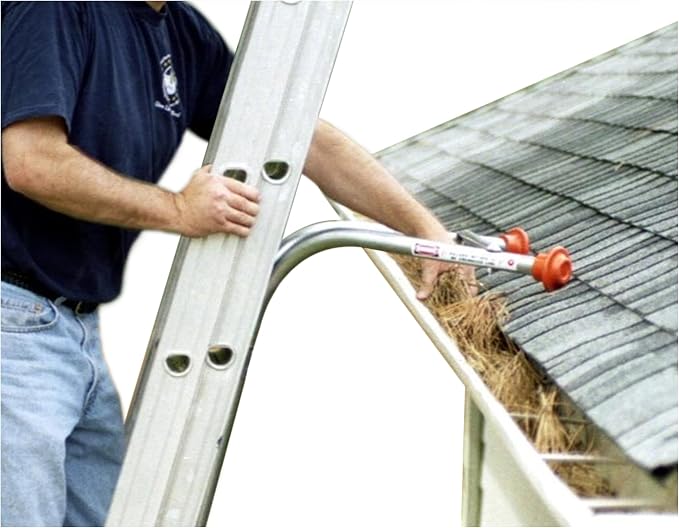
Roof access and working from a ladder laid on a roof are different tasks. An access ladder needs a stable base and suitable upper support; a roof ladder needs equipment approved for the ladder and roof. A standoff and a ridge hook serve different purposes.
A fall from a ladder can cause serious injury. This historical injury report covers ladder and stool incidents; it is not a current risk estimate. Do not attempt roof access without an appropriate ladder, secure setup and a safe way to step on and off.
So how do you protect yourself from injuries when using a ladder? How do you stabilize a ladder on the roof?
Safety Tips when using a Ladder
Some of the most basic safety tips when using a ladder may seem unimportant. But they can save you from a broken limb, or even worse, death.
Which are these safety tips when using a ladder?
- For stepladder work, fully open and lock the spreaders; do not use an ordinary stepladder as a roof-access ladder unless its manufacturer specifically permits that configuration.
- Never set up on the uneven ground, which mostly happens when you are in a hurry to get something done.
- Hold your horses and stabilize the ladder first!
- Use a firm, level base and follow the ladder’s setup instructions. Do not stand on a stepladder’s top cap or top step.
- Another important thing is to make sure the ladder has the right weight rating before using it. The load includes your body weight, clothing, tools and carried materials; do not add the ladder’s own weight as though it were part of that rated user load. Follow the lowest applicable equipment limit.
- At all times, your hips should be within the two rails of the ladder for optimal stability. Don’t try to overreach something on your right or left as it may cause toppling.
- If you must reach something a bit far away on the right or the left side, go down the ladder and move it to the spot you want to reach. A few minutes wasted to ensure your safety is always worth it.
- If it is raining, snowy, or there is ice on the ground, postpone the project for some other time.
- Stay below the highest standing level marked on your particular ladder; there is no single fourth-rung rule for every ladder type.
- Keep the ladder and everything you carry clear of overhead power lines. Do not treat an electrical-work background as permission to ignore clearance requirements.
- Face the ladder and maintain three points of contact while climbing. Keep your hands free and use the handholds specified by the ladder manufacturer.
- It may not seem like it, but it is always better and safer to wear a holster or tool belt. This is to free your hands when going up and down the ladder.
Finally, don’t leave the ladder unattended. Fold and put it away when done fixing whatever you were fixing on the roof. You never know when a child or pet can come running towards it.
Here is how you go about painting the high places without a ladder.
Stabilizing the Ladder against the Roof
Undeniably, greater heights come with higher risks of injury. It pays to take precautionary measures. Well, don’t be in a hurry to complete the cleaning or fixing of the roof. A bit of fear for heights comes in handy in such a situation.
For a leaning extension ladder, the usual setup is about a 1:4 ratio: the horizontal setback is one quarter of the working length measured along the ladder from its feet to the upper support. For example, a 20-foot working length means about a 5-foot setback. This is not the ladder’s total extended length, and it is not the setup rule for a ladder lying on a roof.
For access to an upper landing, extend the side rails at least 3 feet above that landing surface, with the ladder supported and secured according to its instructions. The reference point is the access landing, not the roof ridge.
Place the feet on firm, level ground and secure the ladder against movement using its approved method. Do not stack loose blocks underneath or improvise a footing in soft soil. If the site cannot provide the required support, use a different access method.
The Ladder-Max Original ABM 2002 is a standoff for compatible ladders. Its manufacturer permits wall or roof contact in the prescribed setup; it is not a ridge hook.
Ladder-Max Original ABM 2002 Standoff Stabilizer
- 19-inch standoff and 36-inch tip-to-tip span.
- Steel construction with protective orange tips.
- For compatible ladders and manufacturer-approved wall or roof contact; check rail and rung dimensions.
This steel standoff provides 19 inches of clearance and a 36-inch tip-to-tip span. Check the manufacturer’s fit requirements: more than 11¾ inches between side rails, 12-inch rung spacing and rung depth no greater than 2 inches. Follow the assembly instructions for your ladder; multiposition ladders must be in an approved extension configuration with no overlapping rungs at the mounting position. Its protective tips do not guarantee that every roof or gutter arrangement is suitable.
Best gutter guards for ladders
Stabilizing the Ladder on the Roof
A ladder laid on a pitched roof is a separate setup from the access ladder leaning up to the eave. Plan both arrangements before climbing; reaching the roof is not the time to begin improvising their securement.
Secure the access ladder using the method approved for the ladder and supporting structure. A gutter lip is not a substitute for a suitable rigid support.
Do not rely on a bungee cord clipped to a gutter to secure the ladder. A compatible ridge-hook system holds a roof ladder against the opposite side of a suitable roof peak; it does not secure the separate access ladder or provide personal fall protection.
Check the hook instructions, ladder suitability and roof construction before use. A ridge hook is not a universal attachment for every roof profile, covering or ladder.
The Tie Down RoofZone 65005 ladder hook with wheel is offered here as a two-pack.
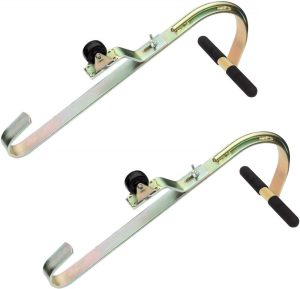
Tie Down RoofZone 65005 Ladder Hooks with Wheels — 2-Pack
- Zinc-plated steel ridge hooks with wheels and rubber-covered T-bars.
- Two hooks for a compatible roof ladder; follow the top-two-rung mounting instructions.
- For the specified roof-ridge setup, not gutter anchoring or personal fall protection.
The zinc-plated steel hooks have wheels and rubber-covered T-bars. Tie Down recommends two hooks per ladder, attached to its top two rungs as specified in the instructions. The intended setup has the ladder lying flat on the roof and the hooks bearing on the opposite side of the ridge. Protective rubber is not a guarantee against damage to tiles or other roofing.
Maintain secure access for the entire job. Neither these hooks nor a standoff replaces appropriate fall protection or a safe access plan; stop and obtain professional help if the setup cannot be made suitable.
Underlayment for floating engineered-wood floors
Moving to the Top of the Roof
The transition from an access ladder to the roof needs a clear, supported landing and a secure handhold. Keep the access ladder’s side rails at least 3 feet above the landing; do not interpret this as extending a roof ladder 3 feet above the ridge.
Choose a suitable extension ladder and follow its instructions for stepping onto and off the landing. Do not climb over an obstructed top or improvise a transfer that leaves you without secure support.
Don’t step on debris, branches, and leaves to avoid slips and falls. That means you must mind your steps and where you sit.
Please don’t leave your tools everywhere on the roof as they can pose several risks by themselves. You can step on them, and trying to reach them can be risky as well.
The last thing you want is getting tangled with chords, tape measures, and other tools, and so you should keep a close eye on them, as well.
Conclusion
Before climbing, make sure the access ladder has a firm, level base and secure upper support. A roof ladder must be installed according to its own approved system.
Keep access-ladder securement separate from the ridge hooks used on a compatible roof ladder. Do not rely on a bungee cord or gutter lip as the securing point.
More importantly, use the ladder in dry and calm weather. Follow the recommended safety tips by experts.
Happy working, folks!